
Every time you toss a broken lamp, a torn shirt, or a squeaky chair, you are literally throwing money into the trash. The average household spends over $1,200 a year replacing items that could be fixed in under an hour for pennies. By adopting a simple DIY triage mindset, you can stop that financial leak and build a healthier savings account at the same time.

To help you supercharge your savings, consider using a Wooden Money Saving Box to stash away every dollar you save by repairing instead of buying new. This guide will teach you how to assess, fix, and save — without needing an engineering degree.
Table of Contents
Why Repairing Beats Replacing Every Time
The Financial Case
The numbers are stark. A new blender costs $40. A $2 rubber gasket fixes the old one. A leather couch cushion is $120 to reupholster; a $6 patch kit makes it look new. Repairing typically saves you 70% to 90% compared to buying a replacement.
The Environmental Case
Landfills receive over 12 million tons of furniture and textiles every year. Every repair keeps one more item out of the dump. When you repair, you reduce your carbon footprint while also protecting your wallet.
The Skills Case
Each repair teaches you something valuable. You learn how things work, how to diagnose problems, and how to become more self-sufficient. That knowledge pays dividends on every future fix.
The DIY Triage Mindset: Assess Before You Act
A triage nurse doesn't start surgery immediately. They assess, prioritize, and then act. Here is the same approach for your broken belongings:
Step 1: Diagnose the Problem
Look for the obvious cause. A wobbly chair leg usually means a loose screw, not a broken joint. A flickering light might be a bulb connection, not faulty wiring. Write down what you see, hear, and feel.
Step 2: Estimate Repair Cost vs. Replacement Cost
Gather the price of the replacement item and the cost of parts and tools for the repair. If the repair costs more than 50% of the replacement, you may want to proceed with caution.
Step 3: Consider Your Skill Level
Be honest. If you have never used a soldering iron, don't start on a motherboard. Begin with simple fixes like tightening hardware, lubricating moving parts, or replacing cords.
Step 4: Set a Time Budget
If a repair takes more than two hours, ask yourself if the item is worth that time. For a high-value item, it may be worth it. For a $10 toaster, probably not.
Essential Tools for Your DIY Repair Kit
You don't need a workshop to fix most items. Start with these basics:
- Screwdriver set (Phillips and flathead, multiple sizes)
- Pliers (needle-nose and slip-joint)
- Adjustable wrench
- Multi-bit drill/driver (for furniture repairs)
- Super glue and wood glue
- Duct tape, electrical tape, and painter's tape
- Sewing needle and thread (for clothing and upholstery)
- Sandpaper and wood filler
- Lubricant (WD-40 or silicone spray)
With these tools, you can handle 80% of common household breakdowns.
Common Household Repairs You Can Tackle Today
Leaky Faucets
A dripping faucet wastes over 3,000 gallons of water a year. Replacing a worn rubber washer costs under $1. Turn off the water supply, disassemble the handle, swap the washer, and reassemble. Total time: 15 minutes.
Torn Clothing or Upholstery
A small rip in a favorite shirt or couch cushion is a simple fix. Use a needle and thread for seams, or a patch kit with iron-on adhesive for larger holes. A $5 repair saves you from buying a $50 shirt or a $500 new couch.
Stuck Drawers or Doors
Wood swells with humidity, causing drawers and doors to stick. Rub a bar of soap or a candle along the runners to lubricate the movement. If the wood has warped, use a block plane to shave off a thin layer.
Cracked Phone Screens (DIY Kits)
You can buy a screen replacement kit for $20 to $40. Watch a YouTube tutorial specific to your phone model. A successful fix saves you $150 to $300 at a repair shop.
Squeaky Floorboards
Sprinkle baby powder or graphite powder into the gaps between boards. For persistent squeaks, drive a finish nail at an angle through the board into the subfloor.
Loose Furniture Hardware
Tightening screws and bolts on chairs, tables, and cabinets takes five minutes. Use a drill/driver for speed, but be careful not to overtighten and strip the wood.
When Repairing Isn't Worth It: Know the Threshold
DIY triage includes knowing when to walk away.
The 50% Rule
If the repair cost exceeds 50% of the replacement cost, and the replacement is under $100, it is often better to replace.
Safety Concerns
Never repair electrical items with exposed wires, cracked casings, or water damage yourself. Leave those to professionals.
Lack of Parts Availability
If the manufacturer no longer makes parts for a 15-year-old appliance, it may be time to replace.
When You Love the Item
Sentimental value changes the equation. A grandmother's rocking chair is worth repairing even if the cost exceeds replacement. That is a personal choice, not a financial one.
How to Fund Your DIY Savings: Use a Savings Challenge
The money you save by repairing is real. Put that cash into a dedicated savings tool so you can see your progress and stay motivated.
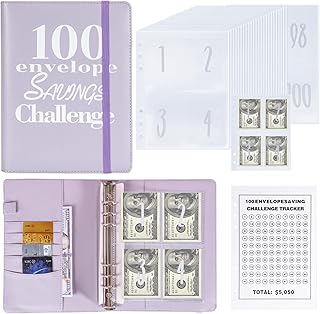
For example, the 100 Envelopes Money Saving Challenge helps you save $5,050 by following a simple numbering system. Every time you repair instead of replace, drop that saved amount into the corresponding envelope.

If you prefer a visual motivator, the 10000 Kakeibo Wooden Money Saving Challenge Box is a wooden cash vault that you fill until you reach your goal. It is reusable, so you can start a new challenge every time you hit your target.
Another excellent option is the Wooden Money Saving Box (12 Amounts) with a built-in progress tracker and dry erase pen. It's perfect for families teaching kids the value of repairing before replacing.
For those who love binders and envelopes, the NICOOTH 100 Envelopes Savings Challenge Book (only $6.48) provides a structured way to save $5,050. It even includes a tracker to mark your progress.
If you need a secure place to store the cash you save, consider the KYODOLED Cash Box with Key Lock . It has a sturdy 0.7mm steel construction and an auto-pop coin tray, perfect for organizing your repair savings.
Real Talk: Is It Always Cheaper? A Cost-Benefit Table
| Item | Replacement Cost | Repair Cost | Tool Investment (if buying first time) | Verdict |
|---|---|---|---|---|
| Leaky faucet | $80–$200 | $1–$5 | $15 for wrench set | Repair |
| Torn denim jeans | $40–$70 | $2 (patch) | $5 for needle/thread | Repair |
| Cracked phone screen (iPhone) | $300–$600 | $25 (kit) | N/A if you own tools | Repair |
| Broken toaster | $20–$40 | N/A (no parts available) | N/A | Replace |
| Squeaky floorboard | N/A | $0 (soap or powder) | $0 | Repair |
| Wobbly dining chair | $100–$300 | $0 (tighten screws) | $0 | Repair |
| Blender leaking seal | $40–$80 | $2 (gasket) | $5–$10 | Repair |
| 15-year-old refrigerator | $1,200–$2,500 | $150–$300 (compressor) | N/A | Call a pro, then decide |
Use this table as a quick reference. In almost every case, the repair pays for itself in one use.
Conclusion: Start Small, Save Big
You don't need to be a master carpenter or an electrician to save money. The DIY triage approach is simply about pausing before you toss something, assessing the problem, and giving it a quick fix. Most repairs take less than 20 minutes and cost under $10.
Track every dollar you save. Put that cash into a Savings Challenge Box or a Budget Binder . Watching your savings grow will motivate you to keep repairing.
Remember: every item you fix is one less thing in the landfill and one more dollar in your pocket. Start your first triage today.
Frequently Asked Questions
Q1: What is the easiest repair for a total beginner?
A: Tightening a loose screw on a wobbly chair or door handle takes one minute and requires no tools beyond a screwdriver. It is the best way to build confidence.
Q2: How do I know if a repair is safe to do myself?
A: Never work on gas appliances, electrical items with exposed wires, or anything involving high pressure (like a water heater). For everything else, power down the device and follow online guides from trusted sources.
Q3: Can I really save $5,000 using a savings challenge while repairing?
A: Yes. If you repair two items per week that would have cost $50 each to replace, you save $100 weekly. That adds up to $5,200 in a year. Use an envelope or wooden savings box to stay organized.
Q4: What should I do with truly broken items that can't be repaired?
A: Recycle the materials if possible. Many cities have electronics recycling programs. For metal items, scrap yards pay by weight. Donate working parts to local repair cafes or makerspaces.
Q5: Where can I find repair guides for specific items?
A: YouTube and iFixit are excellent resources. Search for your item's brand and model plus "repair" or "how to fix." Most guides include video walkthroughs and parts lists.